Writing Documentation and Prose in Markdown Using Helix

Table of Contents
Introduction
Helix is not only the perfect code editor but also ideal for writing documentation. By combining the advantages of its modal editing with many built-in features, Helix makes creating documentation and prose a fantastic experience.
As most documentation is written in Markdown, this tutorial focuses on Helix’s Markdown capabilities. We will explore key features, suggest additional configurations, and recommend third-party language servers. This tutorial is specifically designed for Helix version 25.01.1.
Using Soft Wrap
Soft wrapping allows your documents to automatically adapt to your editing window or a specified line length without imposing permanent hard formatting. This feature makes editing documents much easier and is essential to enable.
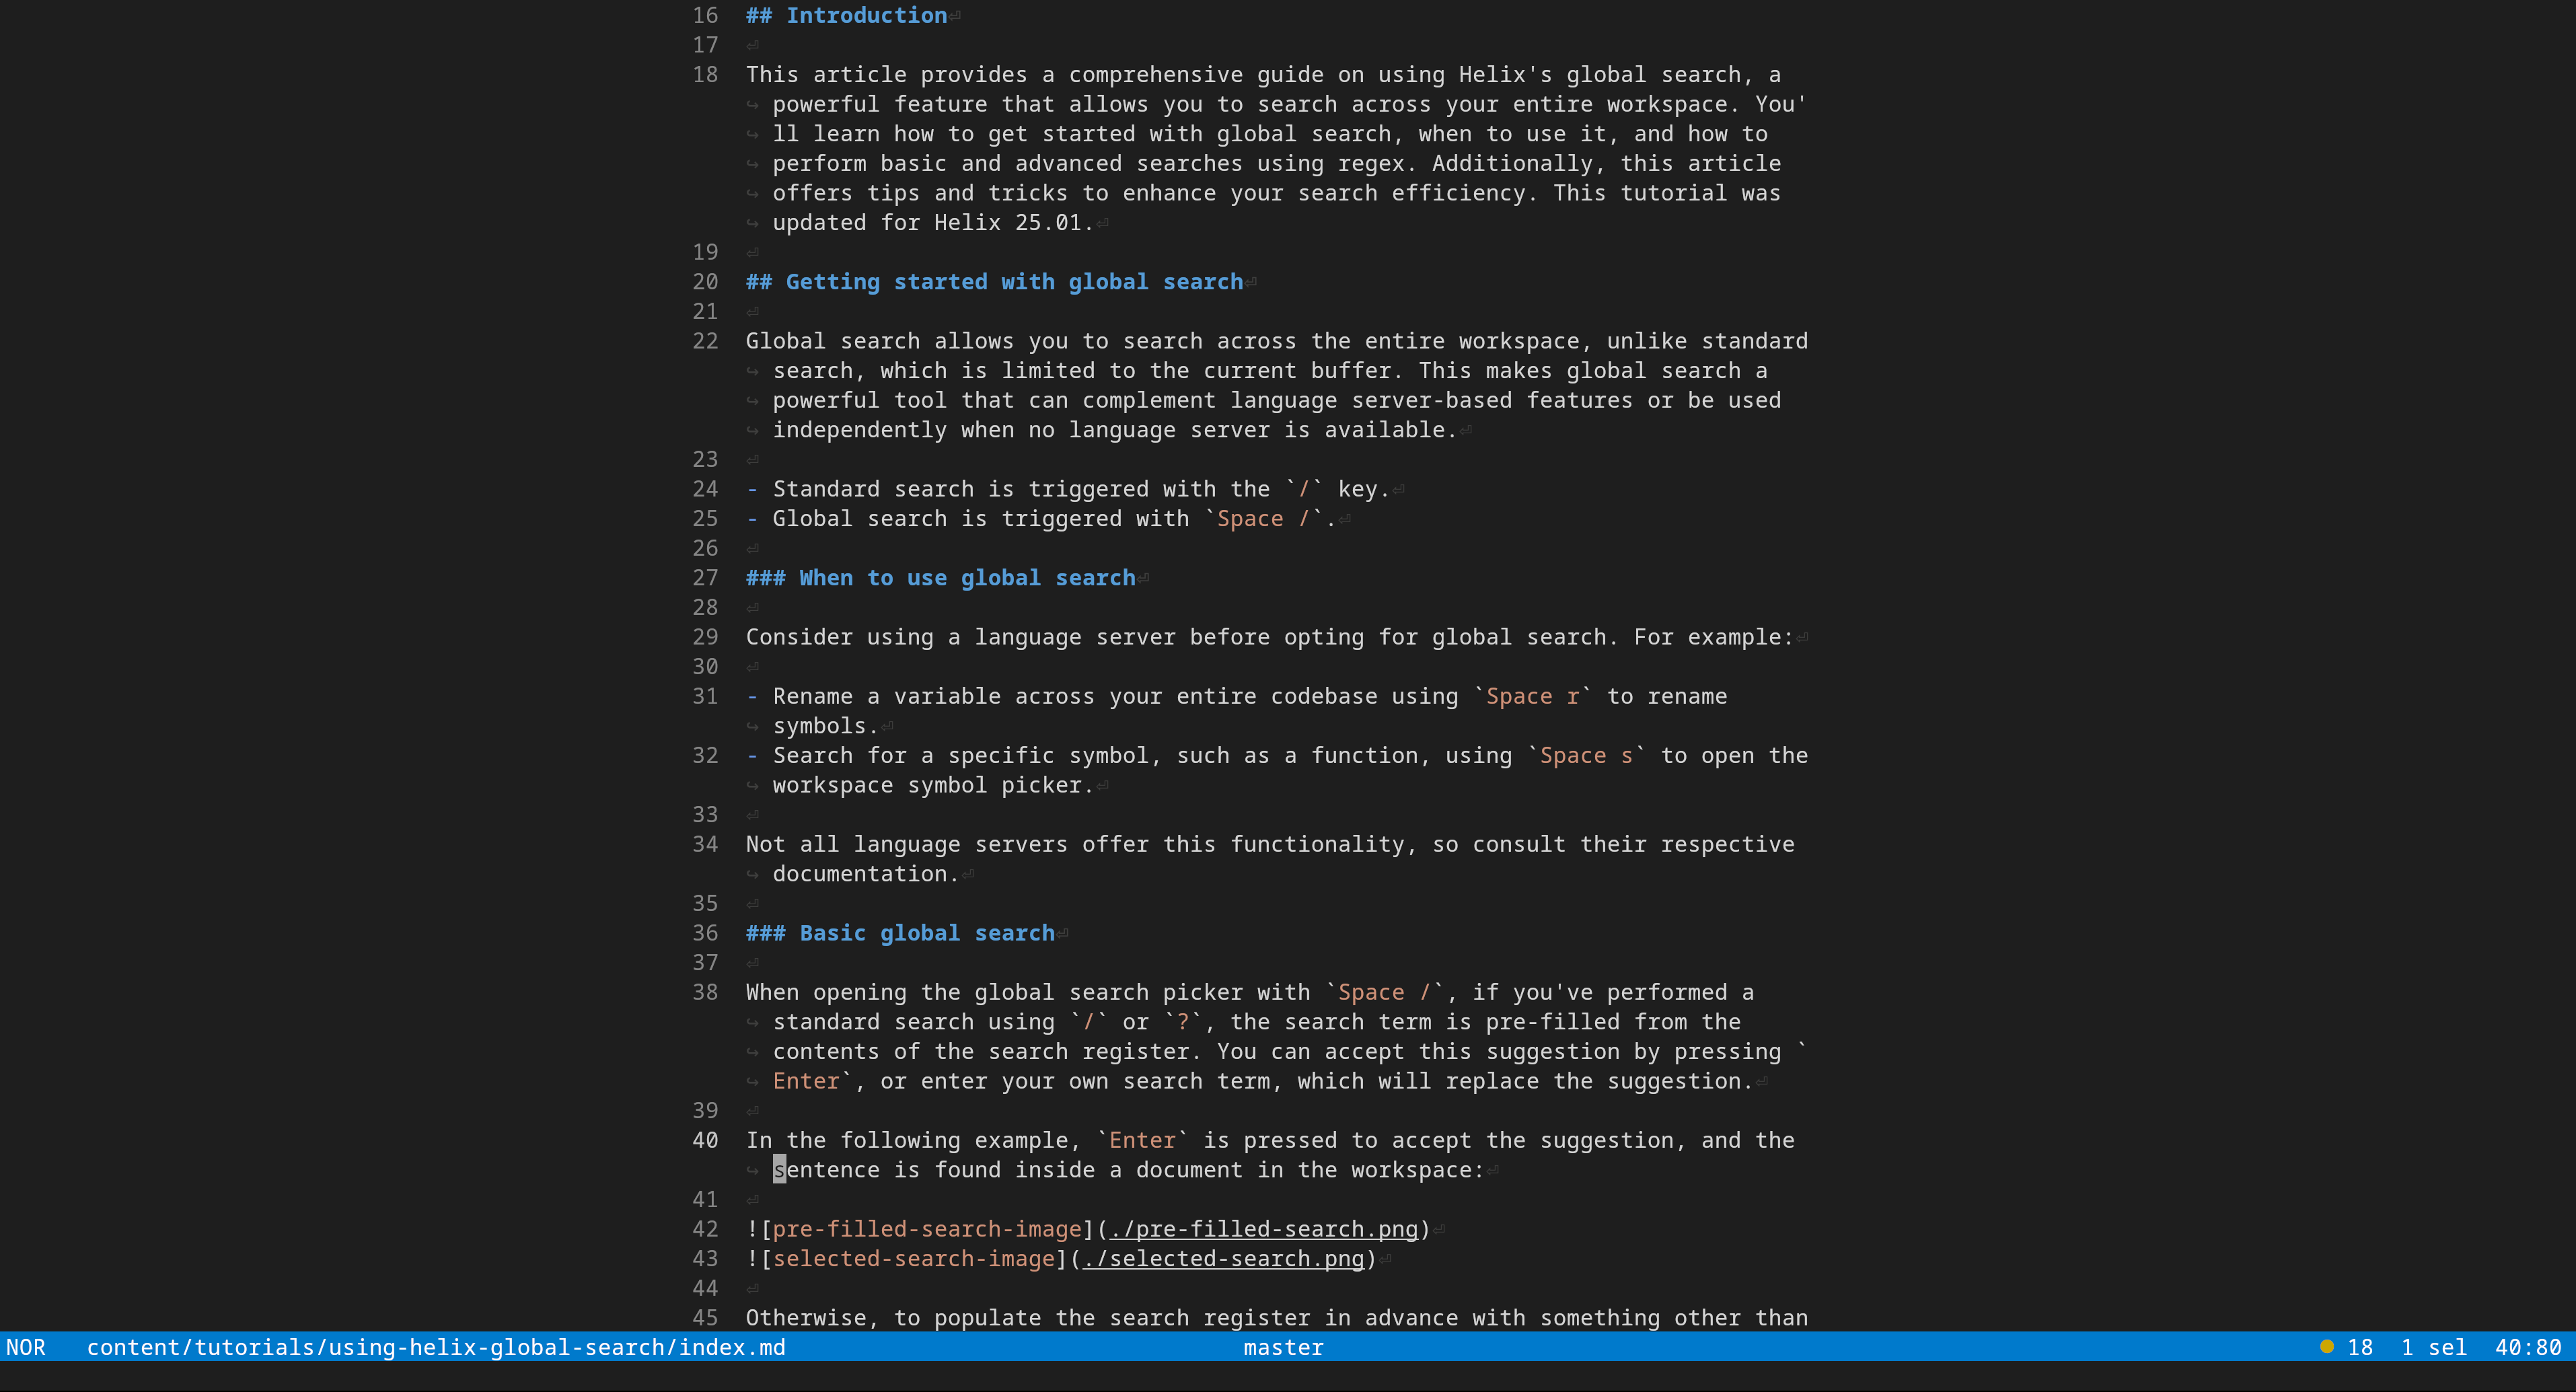
When text wraps, a wrap indicator symbol appears at the beginning of the new line:

You can easily change or remove the wrap indicator symbol; in this example, we remove it entirely:
config.toml
[editor.soft-wrap]
wrap-indicator = ""

By default, soft wrap is disabled. You can enable it in the following contexts:
- Globally in the
config.tomlfile:
[editor.soft-wrap]
enable = true
- Per project in the
.helixdirectory’sconfig.tomlfile:
[editor.soft-wrap]
enable = true
- Per language in the user’s
languages.tomlfile, in this example for Markdown:
[[language]]
name = "markdown"
soft-wrap.enable = true
Enabling soft wrap adjusts the text to fit the width of your window, which is particularly useful in smaller window sizes, such as when using vertically split views. If you prefer a more readable format in a full-screen window, you might want to set a maximum width, such as 80 characters:
languages.toml
[[language]]
name = "markdown"
soft-wrap.enable = true
text-width = 80
soft-wrap.wrap-at-text-width = true
A value of 80 characters is a good choice to make the text easier to read.
soft-wrap.wrap-at-text-widthtells Helix to use thetext-widthrather than the window size.
Toggling soft wrap
You can add the following to toggle soft wrap on and off:
config.toml
[keys.normal.space.t]
s   = ":toggle soft-wrap.enable"
Soft wrap vs :reflow
:reflow is Helix’s version of hard wrap, it makes permanent changes to your formatting. The line length can be set with text-width in your config.
A full list of configuration options is available in the documentation.
Working with Markdown Links
Quick Link Creation
To quickly create links to, for example, images:
- In insert mode, type
!to start creating an image link. - Type
[to automatically create a pair using automatic pair completion, then type the image link text inside it. - Press
Tabto skip over the closing]using the smart tab feature. - Create another pair of brackets with
(. - Use path completion by typing
./to find files in the current directory and select the desired image file.
Editing Links with Match Mode
To quickly select text within links, use the match mode with the command mim (match inside closest surrounding pair):
- In normal mode, place the cursor inside the
[]or()pairs. - Type
mim. - Proceed with operations like
cto change oryto yank.

Opening Links in a Browser
To open a link in your browser, place the cursor over the URL and type gf.
Using the Marksman Language Server
Marksman is a general-purpose language server for Markdown and is the default in Helix. To use Marksman, install it, and it will work out of the box.
Navigation with the Symbol Picker
Marksman helps you quickly find and jump to specific headings or anchor tags in a document.
-
Open the Symbol Picker: Press
Space s.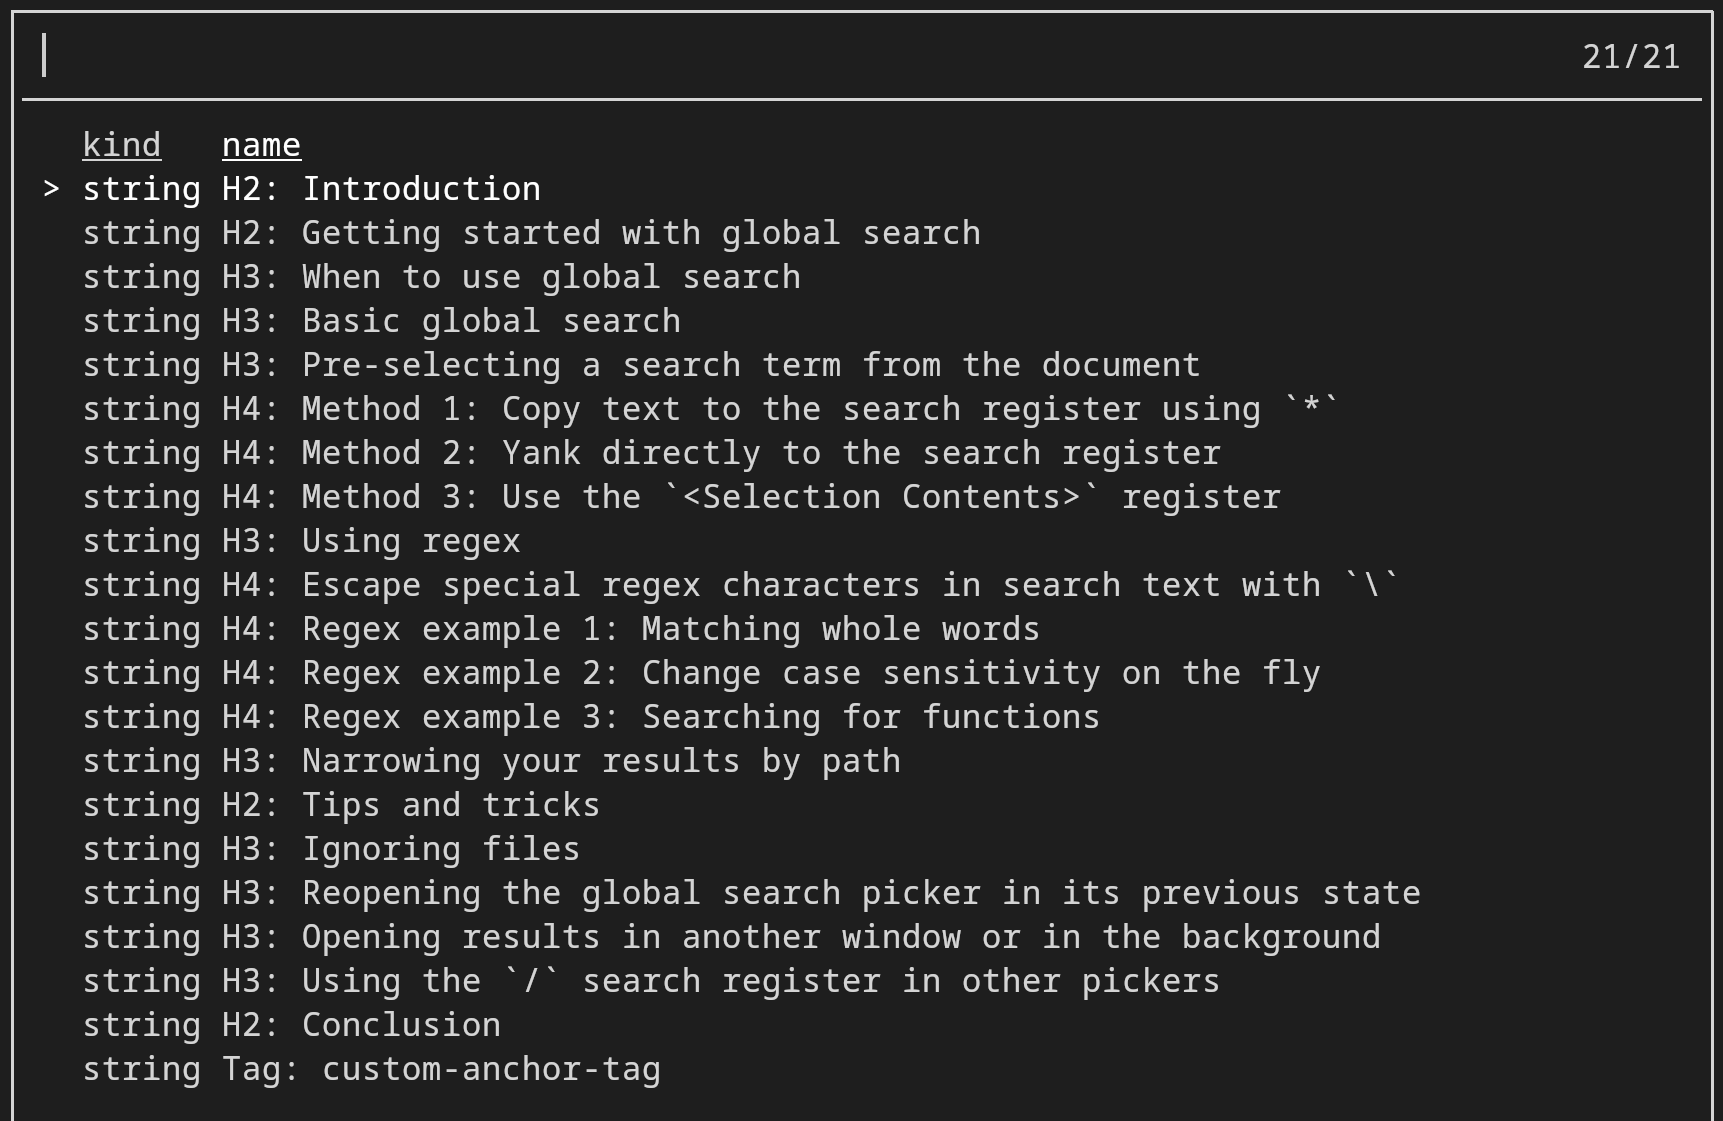
-
View Headings and tags: The symbol picker displays a fuzzy searchable list where:
- Kind: Is always
string. - Name: Consists of the heading level or Tag and the title.
- Kind: Is always
Navigation with Goto Definition
To navigate using goto definition on links:
- Place your cursor on the link: Press
gd.
Choosing a Spelling/Grammar Checking Language Server
There are three main choices for a language server for grammar and spelling. Here, we will compare them.
Harper-ls
Harper is the latest and most promising language server. It is written in Rust and uses much fewer resources than the competition. It was recently acquired by Automattic, and the main developer was hired to work on it full-time, so it looks like it has a bright future.
- ✓ Ability to save words to a dictionary using code actions
- ✓ Faster and more resource-efficient than competitors
- ✗ Less comprehensive grammar checking due to it being so new
- ✗ Only supports US English
Vale
Vale stands out by enforcing custom style guides for technical writing alongside spell checking, though its grammar checking is less advanced. Its newly introduced language server is still basic.
- ✓ Wide range of style guides available, including Microsoft
- ✗ Primitive language server support, for example you have to constantly hit save to update the language server, or it gets out of sync with the document
- ✗ Only supports US English
Ltex-ls Plus
LTEX+ is a new fork of LTEX Language Server which uses LanguageTool under the hood. Development of ltex-ls had stalled, but now with the new fork, fixes and features are being quickly merged.
LanguageTool is a very mature and respected grammar and spell checker. It has the most advanced grammar checking and can be used with n-gram data for even more advanced features. Unfortunately, it is quite slow and uses a large amount of memory. It can take quite a while to initially check even a small document, but once the initial check is done, it speeds up considerably.
- ✓ Superior grammar and spell checking
- ✓ Supports many natural languages
- ✓ Highly configurable
- ✗ Currently unable to save words to a dictionary using code actions
- ✗ Resource-intensive and slow
Comparison of Language Servers
| Feature | Harper-ls | Vale | LTeX+ |
|---|---|---|---|
| Multi-language Support | ❌ | ❌ | ✅ |
| Custom Dictionaries | ✅ | ✅ | ⚠️ Manual |
| Real-time Feedback | ✅ | ❌ | ✅ |
| Resource Usage | Low | low | High |
Configuring ltex-ls-plus
ltex-ls-plus is my current recommendation. Support is built into Helix, so you just need to install it into your PATH and add it to languages in your languages.toml file. Helix has
Marksman as the default Markdown language server. You can also add ltex-ls-plus as Helix allows multiple language servers to run at once:
[[language]]
name = "markdown"
language-servers = ["marksman", "ltex-ls-plus"]
ltex-ls-plus Custom Settings
You can add custom
settings. The following sets the default diagnostic severity level to warning, disables the profanity rules, and adds the word builtin to the dictionaries for US and GB English.
[language-server.ltex-ls-plus.config]
ltex.diagnosticSeverity = "warning"
ltex.disabledRules = { "en-US" = ["PROFANITY"], "en-GB" = ["PROFANITY"] }
ltex.dictionary = { "en-US" = ["builtin"], "en-GB" = ["builtin"] }
You can add words to the dictionary manually here for each language; it is not a great way to do it compared to using a code action, but better than nothing.
Setting the Language per Document in ltex-ls-plus
You can select the language of your Markdown document using front matter at the top of your document. For example, using the default US English:
---
lang: en-US
---
This setting would result in errors if you use British English:

Using Prettier to Format Your Markdown
For Markdown formatting, Prettier is highly recommended. While other faster formatters exist, Prettier uniquely supports formatting across multiple languages within code blocks.
The following settings instruct Helix to automatically format Markdown using Prettier when the document is saved. Alternatively, you can omit the auto-format setting and use the :format command manually instead.
languages.toml
[[language]]
name = "markdown"
formatter = { command = 'prettier', args = [
  "--parser",
  "markdown",
  "--prose-wrap",
  "never", # <always|never|preserve>
] }
auto-format = true
Markdown Preview in the Browser
There are many different ways to preview your Markdown files in a browser. There are terminal-based previews like
glow, but they don’t display images, making them mostly useless. If you are using a particular framework or application like Hugo or mdBook, it will have its own built-in live previewing, for example, hugo serve and mdbook serve.
If you don’t have a live preview available, you can use the following solutions:
Previewing with Pandoc
If you don’t need your preview to automatically update when saving your document, a simple key binding using Pandoc works well on Linux and macOS:
config.toml
[keys.normal]
"F6" = "@:sh pandoc --resource-path <C-r>%<C-w> --self-contained --metadata title='Preview' <C-r>% -o /tmp/md-preview.html && xdg-open /tmp/md-preview.html<ret>"
This macro keybinding uses Pandoc to convert the current file into fully styled HTML with highlighted code blocks. It expects a Markdown file in the current buffer and stores the converted HTML file in the system’s /tmp directory. To ensure images load correctly, Pandoc needs the directory path of the document, which is set using --resource-path. The document opens in your system’s default HTML viewer, typically your browser.
Previewing with the markdown-preview GitHub CLI Plugin
A good option for live previews with automatic updating is gh markdown-preview. It requires GitHub CLI as a dependency.
To preview your file in the browser, use gh markdown-preview <filename>, and your document will open in the browser using the same styling as GitHub. Save your document, and it will automatically update the preview, or set Helix to
automatically save after a set period of time since the last edit.
Previewing with Markdown Preview Language Server
A new language server, Markdown Preview Language Server, allows previewing Markdown in a web browser and works with Helix. It can be configured using the supplied settings and downloaded from the GitHub releases page, effectively replacing the unmaintained https://github.com/euclio/mdpls.
Creating a Zen Mode
Zen mode is a term borrowed from VS Code Zen mode to describe a mode that minimizes distractions by removing unnecessary information from the screen, so the user can focus, presumably like a zen Buddhist meditating on their work.

One of the main features is the centering of the document on the screen, so the user does not need to look left or right and strain their neck.
There is a pull request for added zoom & max-width waiting to get a basic centering mode working, but for now, you can use this hack to toggle a window to be centered. You can increase the minimum number of characters to use for the line numbers from 3 to whatever is needed to push your editing area right and into the center of the screen. 80 characters is a good line length for readability, or maybe 100 max. You can read more in this article on line lengths. Here is a setting that works well on a 4k screen:
[keys.normal.space.t]
z = ":toggle gutters.line-numbers.min-width 52 3"
You may need to adjust the value of 52 depending on your monitor and terminal. On Linux and macOS, if you type stty size into your terminal when it is full screen, you will get back the horizontal length in characters. For example:
$ stty size
48 192
If your terminal width is 192 characters, and you want to create a space of 80 characters in the middle, you need to calculate the spaces on each side.
# Subtract the desired width (80 characters) from the total available width (192 characters).
# The result is the combined space that will be allocated on both sides of the 80-character area.

192 - 80 = 112

# To find out how much space is on each side, divide this number by 2:
112 / 2 = 56

# Subtract another 4 characters to account for the line numbers and the git gutter:
56 - 4 = 52
So, there needs to be an extra 52 characters on the left of the 80-character space you want your document to fit into. Here is the result:
Conclusion
This tutorial has provided a comprehensive overview of using Helix for Markdown documentation. We covered essential features such as:
- Enabling soft wrap
- Creating and editing links
- Utilizing the Marksman language server for improved navigation and editing
- Options for grammar and spell checking with various language servers
- Formatting and previewing Markdown documents
By following the configurations and practices outlined here, users can enhance their documentation workflow in Helix, making it more efficient and organized.
Join Our Mailing List, Get 20% Off The Course!
If you are interested in the Mastering the Helix editor course and want to stay updated on the release, we invite you to join our mailing list. By subscribing, you will receive updates on the course progress, release date, and a 20% off discount voucher.
We use Mailchimp for the mailing list, you can unsubscribe at any time by clicking the link in the footer of our emails.
